Input Field and Drop-Zone Tile

In Authoring mode, a new section in the tile menu appears called Authoring Tools
- Input Field: In Authoring mode, you can change the location and enter in the correct answer for the question blank tile. Outside of authoring mode, the correct answer will change to a “?” and validation occurs for inputs. See below for a GIF of the question blank tile in use.
- Drop Zone: In Authoring mode, you can change the location and settings of the drop zone tile. Outside of authoring mode, users can only add tiles to the drop zone.
Input Field Tile
Drop Zone Tile
Layout Options
Use drop zones to help students drag-and-drop tiles into certain regions on the canvas. A number of options are available within Authoring Mode, including 3 Layout options. These options control how the tiles placed in the drop zone will be organized.
- None: The tiles will remain in the spot they are placed.
- Center: Tiles will be moved to the center of the drop zone.
- Flow: Tiles will be organized starting in the top-left corner and flowing to the right.
The Padding between tiles and the edge of the drop zone can be set in the More Tools (⋮) menu inside authoring mode. Padding will impact tiles when the Layout is set to Center or Flow. Use Tile Limit in the More Tools (⋮) menu to define the maximum number of tiles allowed in a drop zone. For example, if the tile limit is set to 2 and there are two tiles already in the drop zone, and a third tile is placed in the drop zone, one of the other two tiles will automatically be removed from the drop zone. Of the 2 tiles, the more recently added tile will be the one removed.
Validation in Drop Zones
Use the validation built into drop zones to provide more robust validation of student work than possible with the input tile.
Step 1 - Decide Upon the Validation Type
After adding a drop zone to a Polypad, click on the More Tools (⋮) menu and select a Validation type from the drop-down menu. Read about each type below.

Match Validation
Open the Polypad below to see an example:
Overview and Use Cases
In match validation, authors place the tiles into the drop zone that students must match to create the correct solution. For example, if the author places a regular hexagon with side length of 1 and a 7 number bar in the drop zone and sets that as the solution, the student must place a regular hexagon and a 7 number bar in the drop zone to create a correct solution. However, the students can place the tiles anywhere in the drop zone to create the correct solution. This mode also works with imported images, text boxes, and polygons with labels. So, match validation is appropriate to use for matching activities. Use the cover validation mode explained below if the exact position of the tiles is important.
Authoring with Match Validation
To author a match validation state, first place the tiles the students will match inside the drop zone. Then, click “Set Solution” in the action bar. When a solution has been set, a ✔ will appear in the upper-right of the drop zone. Remove the tiles from the drop zone, exit authoring mode, and the drop zone is ready for student use.
To edit, delete, or view the solution, re-enter authoring mode and click on the action bar. Click “Show Solution” to view the previously set solution. Clicking this will rebuild the solution inside the drop zone. Be sure to remove the tile(s) from the drop zone before sharing the Polypad with students. Click “Clear Solution” to delete the solution and start over. If the solution is cleared, “Set Solution” won’t appear in the action bar until tiles are placed back in the drop zone.
Compare Validation
Open the Polypad below to see an example:
Overview and Use Cases
Use the compare validation to set correct solutions based on numerical values. For example, students might need to use various number tiles to create a sum equal to 12, a product greater than 100, a mean of 12 and mode of 14, and more.
Authoring with Match Validation
Setting the conditions for a correct solution for compare validation all happen inside the action bar of the drop zone. First select what to compare from the drop down menu in the action bar. Common options include: Sum, product, mean, mode, area, and perimeter. Explore all the options inside the drop down menu. Once the compare method has been selected, use the next drop down to select from =, <, ≤, >, or ≥, and then enter the value in the final input field. Here are some examples:
- “Count ≥ 5” will return a correct solution if the total number of tiles in the drop zone is 5 or more.
- “Sum = 12” will return a correct solution if the sum of the numerical values of the tiles in the drop zone is equal to 12.
- “Area < 50” will return a correct solution if the total area of all the tiles in the drop zone is less than 50.
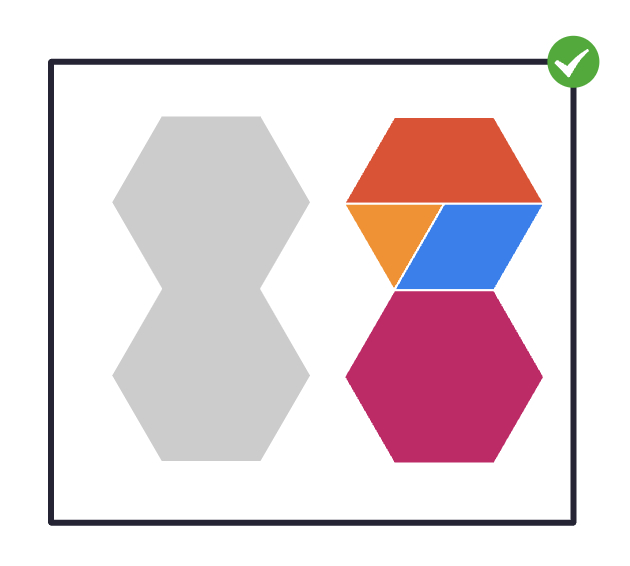
Cover Validation
Open the Polypad below to see an example:
Overview and Use Cases
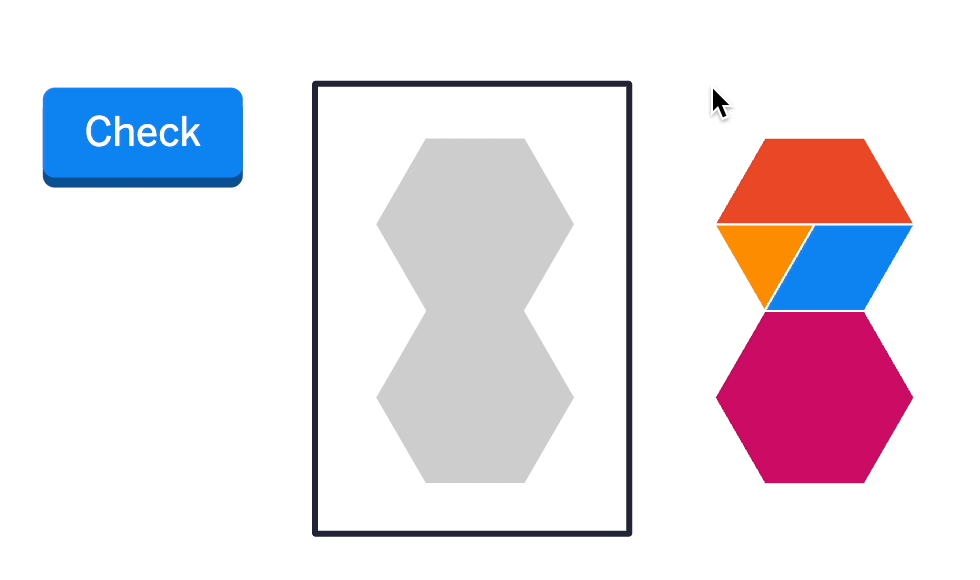
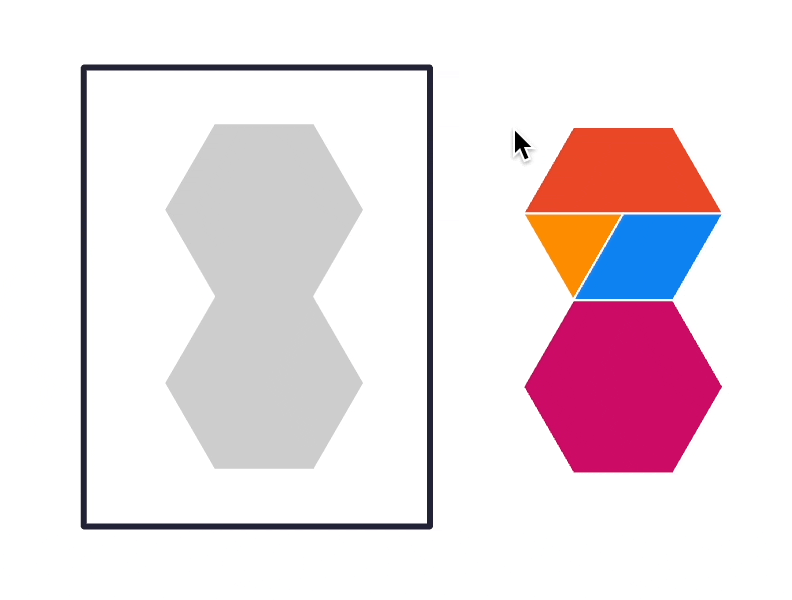
Use the cover validation to create situations in which students must cover a preset area or shape with any combination of tiles. For example, the author could set the goal-state as 2 hexagons and students are tasked with covering the 2 hexagons, but can use any available tiles to do so - triangles, trapezoids, etc.
Authoring with Cover Validation Setting the conditions for a correct solution in cover validation is very similar to match validation. Start by placing the tiles inside the drop zone that students will attempt to cover. Then, click “Set Solution” in the action bar. When a solution has been set, a ✔ will appear in the upper-right of the drop zone. Upon removing the original tile(s) from the drop zone, a gray, joined version of the tiles remains in the drop zone. This is editable inside authoring mode, but will be locked outside of authoring mode. This gray tile indicates to students what they need to cover.
Authors can edit this gray tile. Options include changing the color and transparency, using the ruler option in the sketch tool to draw a line around it, etc. Note, however, that moving the location of the gray tile in the drop zone does NOT change the location of the saved solution. If the gray tile has been moved or deleted, click “Show Solution” in the action bar of the drop zone to rebuild the gray tile.
To edit a solution, click “Clear Solution” in the action bar of the drop zone and start the process from the beginning.
Turn on the “Check Translations” toggle in the More Tools (⋮) menu to allow for all translated versions of the correct solution to be marked as correct. As shown below, when this toggle is on, translated correct solutions are marked correct, but translated and rotated solutions are marked as incorrect.
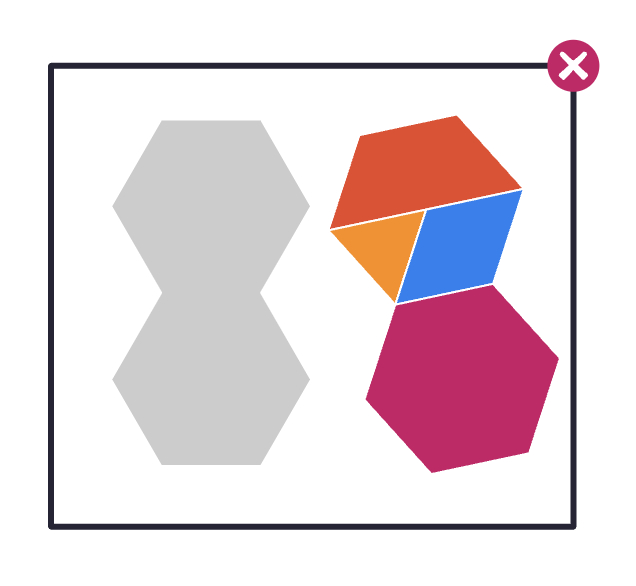
Change the tolerance level to allow for correct solutions that do not exactly cover the goal state. For example, if the tolerance is set to 10, students must cover 90% or more of the goal state in order to be marked correct.
Step 2 - Decide Between Validation-Upon-Check or Auto-Validation
Two options are available for how students receive feedback on their work.
Option 1 - Validation Upon Click of an Action Button
When using this option, students click an action button on the canvas to receive feedback on their work - either a ✅ or a ❌ in the corner of the drop zone.
Follow these steps to create a validation button:
- Inside of Authoring Mode, select the drop zone.
- Open the More Tools (⋮) menu. In the Authoring section, click the Action Button. An action button will now be added to the Polypad and will be automatically selected.
- In the “Action” drop down menu in the action bar of the button, select “Validate.”
- Change the text on the button to the preferred text.
Option 2 - Auto Validation
When “Auto-check” is turned on, validation will happen automatically in the drop zone anytime a tile is placed inside the drop zone or removed from the drop zone.
To turn on auto validation, select the drop zone and open the More Tools (⋮) menu. Turn on the “Auto-check” toggle inside the Tile Options section.
Validation Polypad Pointer Video
Drop Zones and Computation Layer
Use Drop zones inside of Activity Builder to be able to define a Source and export the data from the drop zone into Computational Layer, including if any of the validation methods described above are correct or not. Read more about Using Polypad in Activity Builder and about the Polypad and Computation Layer to learn more.
Other Authoring Tutorial Pages
Edit advanced properties for tiles
Set global settings for the entire Polypad
Select which tiles appear in the sidebar and what tools appear in the bottom toolbar
Turn on and off options in the action bar of tiles
Add custom buttons to the canvas to control tile actions